
Handmade buttonholes are time consuming, I’ll admit, but I always find them much more secure than those made my machine. Before I begin the tutorial I should note that it’s best to stitch buttonholes through at least two layers of fabric or a layer of fabric and interfacing. This ensures that the buttonhole will remain strong and resist stretching. As to the type of thread to use, in this tutorial I use a double layer of 3owt. cotton but almost anything will do, including embroidery floss and even crochet thread. So, let’s get started.
First, determine the length you would like your buttonhole to be by measuring the button you plan on using. Buttonhole size should be determined by adding the diameter plus the thickness of the button. I prefer a tighter buttonhole as they tend to stretch eventually but if you’d like a little wiggle room, add two millimeters to overall measurement. Mark fabric.
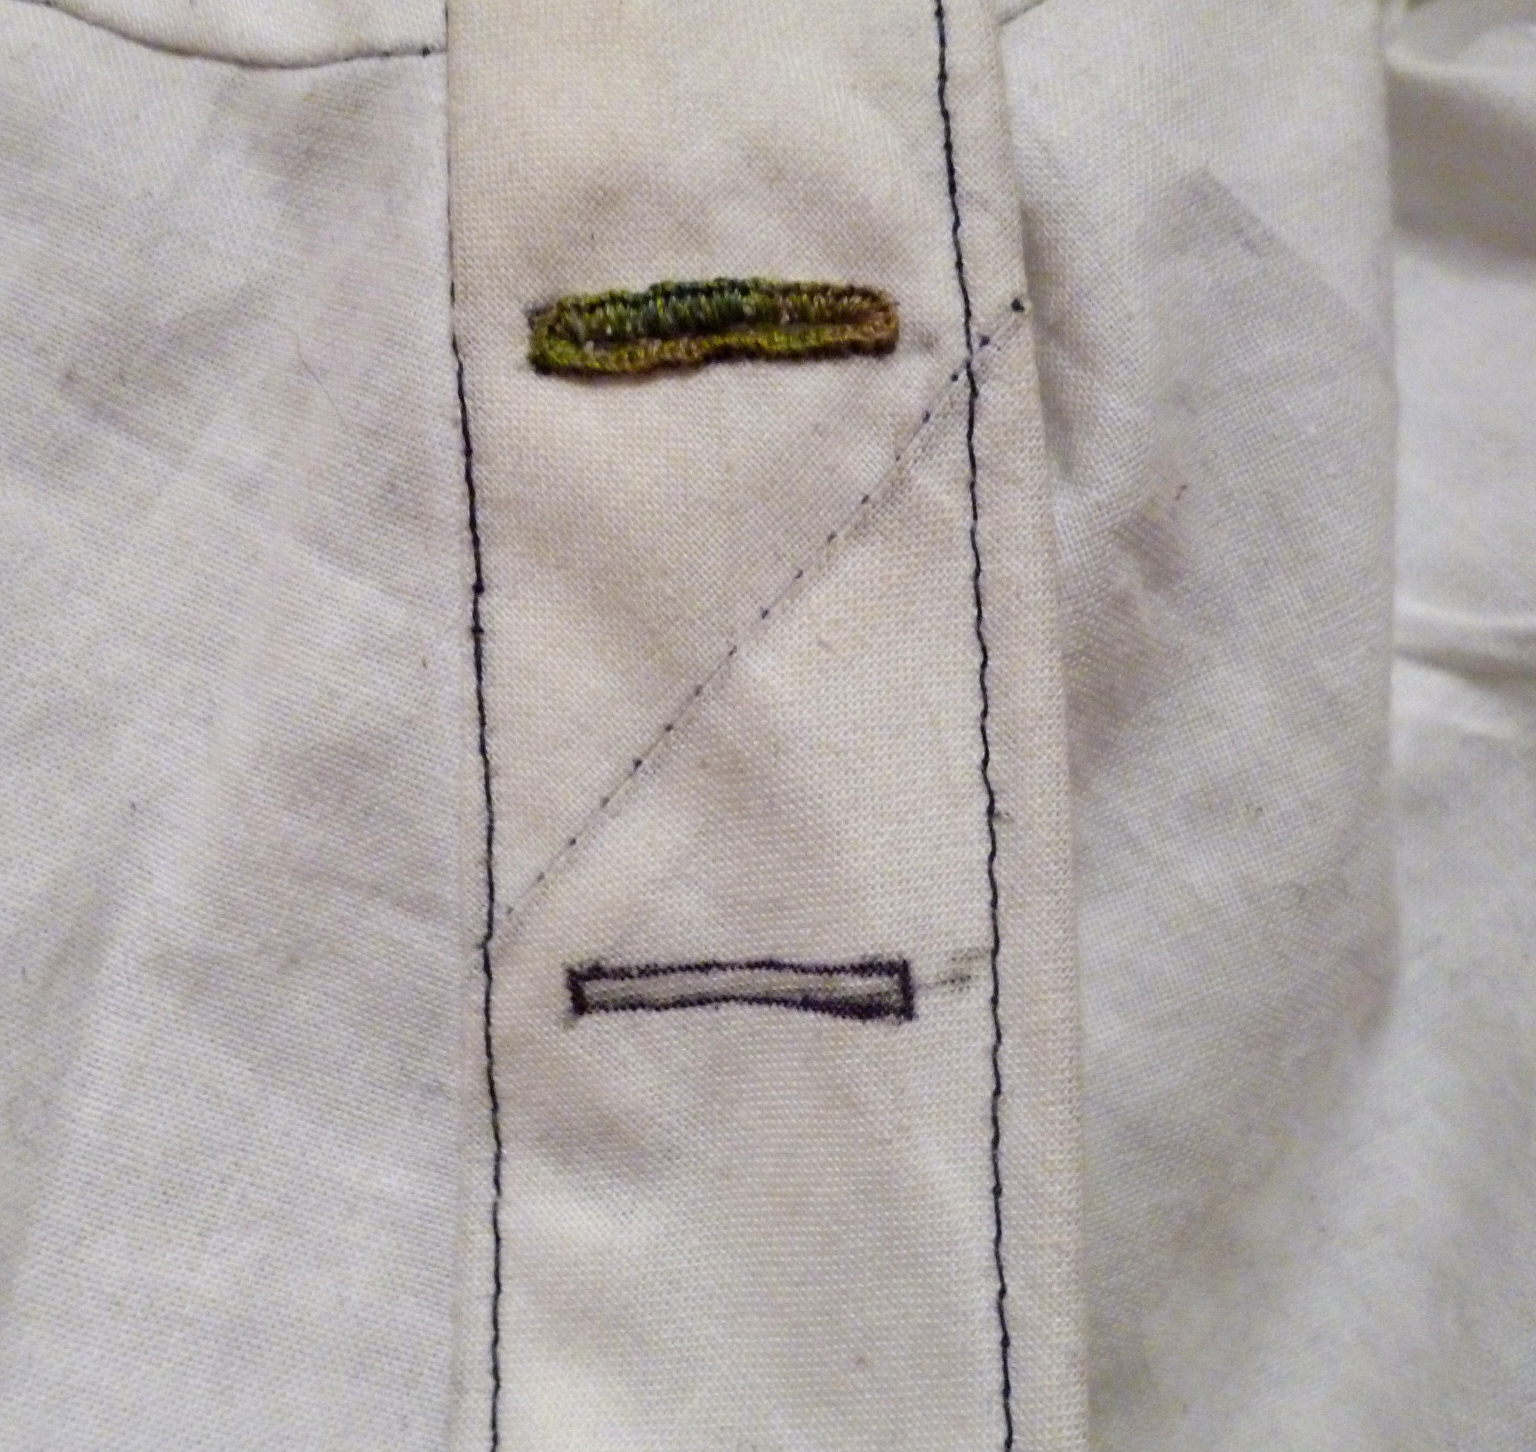
Next, using a simple backstitch, stitch along the outline of your marking.

Stitch two rows of backstitches. This will help secure the fabric once it has been cut and as you work the buttonhole stitch.

Next, carefully pierce the fabric through which the button will eventually pass. You can use an awl or simply a small, sharp pair of scissors. Pierce near the corner where you wish to start working the buttonhole stitch.

Enlarge the hole just slightly with a pair of scissors. I prefer to cut as I stitch as opposed to cutting the whole buttonhole all at once. I find this works better as it eliminates fraying and slipping of the backstitches. Bring needle and thread up through the fabric on the outside of the backstitches near a corner to begin buttonhole stitch.

Begin the buttonhole stitch by passing the needle and thread through the buttonhole opening. Do not pull taut. Instead, bring up the needle directly left of where the thread originally emerges. Take that thread and bring behind the needle, wrapping it around the front of the needle and hold taut as you pull the needle through.


Continue stitching around, carefully clipping the fabric as you go.

To finish off, bring needle and thread through the fabric to the back directly next to last stitch made. Run needle and thread through a series of stitches along the back and simple trim.

And now you’ve got a buttonhole!

I just finished embroidering my 18th century pocket and, since I’m waiting for the wool for my next project to arrive, I thought I’d be indulgent & embroider myself a nice handkerchief to use during our humid summers. I had ordered a couple of yards of white voile in December to use for chemises but there wasn’t enough length. After much debate, I decided it would be perfect and cut into it before I could change my mind.
This interim project presented me with a good opportunity to post another hand-stitching tutorial. Rolled hems are great for projects like handkerchiefs because they create a narrow hem with little bulk and a delicate appearance. They do feel a little tricky at first but as you work you’ll quickly get the hang of it, I promise.
To start, fold the edge of your fabric over desired amount (in my case, a little over a millimeter) and pinch between your fingers.

With your needle, pick up one to two strands of thread from the fabric right before the edge that’s been folded over.

Then insert the needle through two to three strands of thread from the fabric on the fold.

And just pull your needle and thread through and repeat!
I hope that makes sense. I’m crap at explaining instructions verbally since I’m a visual learner and so I tried to take photos that were fairly clear. Also, our gas company has been laying new pipe and jack-hammering three feet from my bedroom window for a week, so I’m running on pretty minimal sleep. If I’m not explaining this well, drop me a comment, I’ll take a nap & try to explain it better when cognition has returned.
Look what I got in the mail today! My cheapo modern machine just wasn’t cutting it in terms of sewing heavier fabrics and, so, Edgar bought me this 1922 Singer in exchange for a leather tool belt I’ve promised to make for him.

She’s a beauty, I think, even if she is a little rugged. All of her gears are as smooth as glass. I haven’t tried out the motor yet since I need to build a desk for her but I’ll mostly be using the hand-crank, either way. Motorized machines and I are not the best of friends so it’s nice to have a non-electrical option, especially if the zombies come a-knockin’.
Now, to just figure out a name . . .
I was really hoping to have my corset finished by the 3rd Historical Sew Fortnightly challenge deadline today but, alas, it’s been a bitch. The problem, I believe, is that my measurements don’t necessarily reflect my body shape and, thus, lots of wrinkles. I’m going to rip all of the good bits out, redraft it and start fresh with only a single layer and external boning. Hopefully, that will work a lot better and be a bit easier on my sewing machine.
I’m saving that for another day, however, when I’ve got a bit of patience back. For now, I’m working on the next challenge, which is “Embellish.” I prefer Victorian garb but I’ve become a bit enamored with 18th century pockets. I just hate carrying around a bag and since pockets in the 18th century were external accoutrement tied onto the clothing as opposed to carried, it works well for me. Plus, I needed a new sit-in-front-of-the-television project.
I’ve designed everything myself so I couldn’t say exactly how historically accurate it will end up being but the Danish Flower Thread is beautiful so it will have that going for it. The pencil lines throughout the drawing are just a way to keep track of what needs to be done each day to finish by deadline. It’s going to be a tight race.


prepped to add the boning
Well, after much struggle, I’m ready to add the boning to my first corset. Given that I drafted the pattern myself and didn’t make a muslin before hand, it’s turned out damned decent. I did have to rip a bunch of seams and redraft them but all mistakes are an opportunity to learn, I suppose.
Now, to just keep everything from shifting horribly while I sew the channels. Each channel will be hand-sewn as will the binding so who knows when it will be finished. I was hoping by Monday, to have it done in time for the third deadline of Historical Sew Fortnightly, but that’s likely a pipe dream. So long as I eventually finish it, I’ll be happy.

