
Handmade buttonholes are time consuming, I’ll admit, but I always find them much more secure than those made my machine. Before I begin the tutorial I should note that it’s best to stitch buttonholes through at least two layers of fabric or a layer of fabric and interfacing. This ensures that the buttonhole will remain strong and resist stretching. As to the type of thread to use, in this tutorial I use a double layer of 3owt. cotton but almost anything will do, including embroidery floss and even crochet thread. So, let’s get started.
First, determine the length you would like your buttonhole to be by measuring the button you plan on using. Buttonhole size should be determined by adding the diameter plus the thickness of the button. I prefer a tighter buttonhole as they tend to stretch eventually but if you’d like a little wiggle room, add two millimeters to overall measurement. Mark fabric.
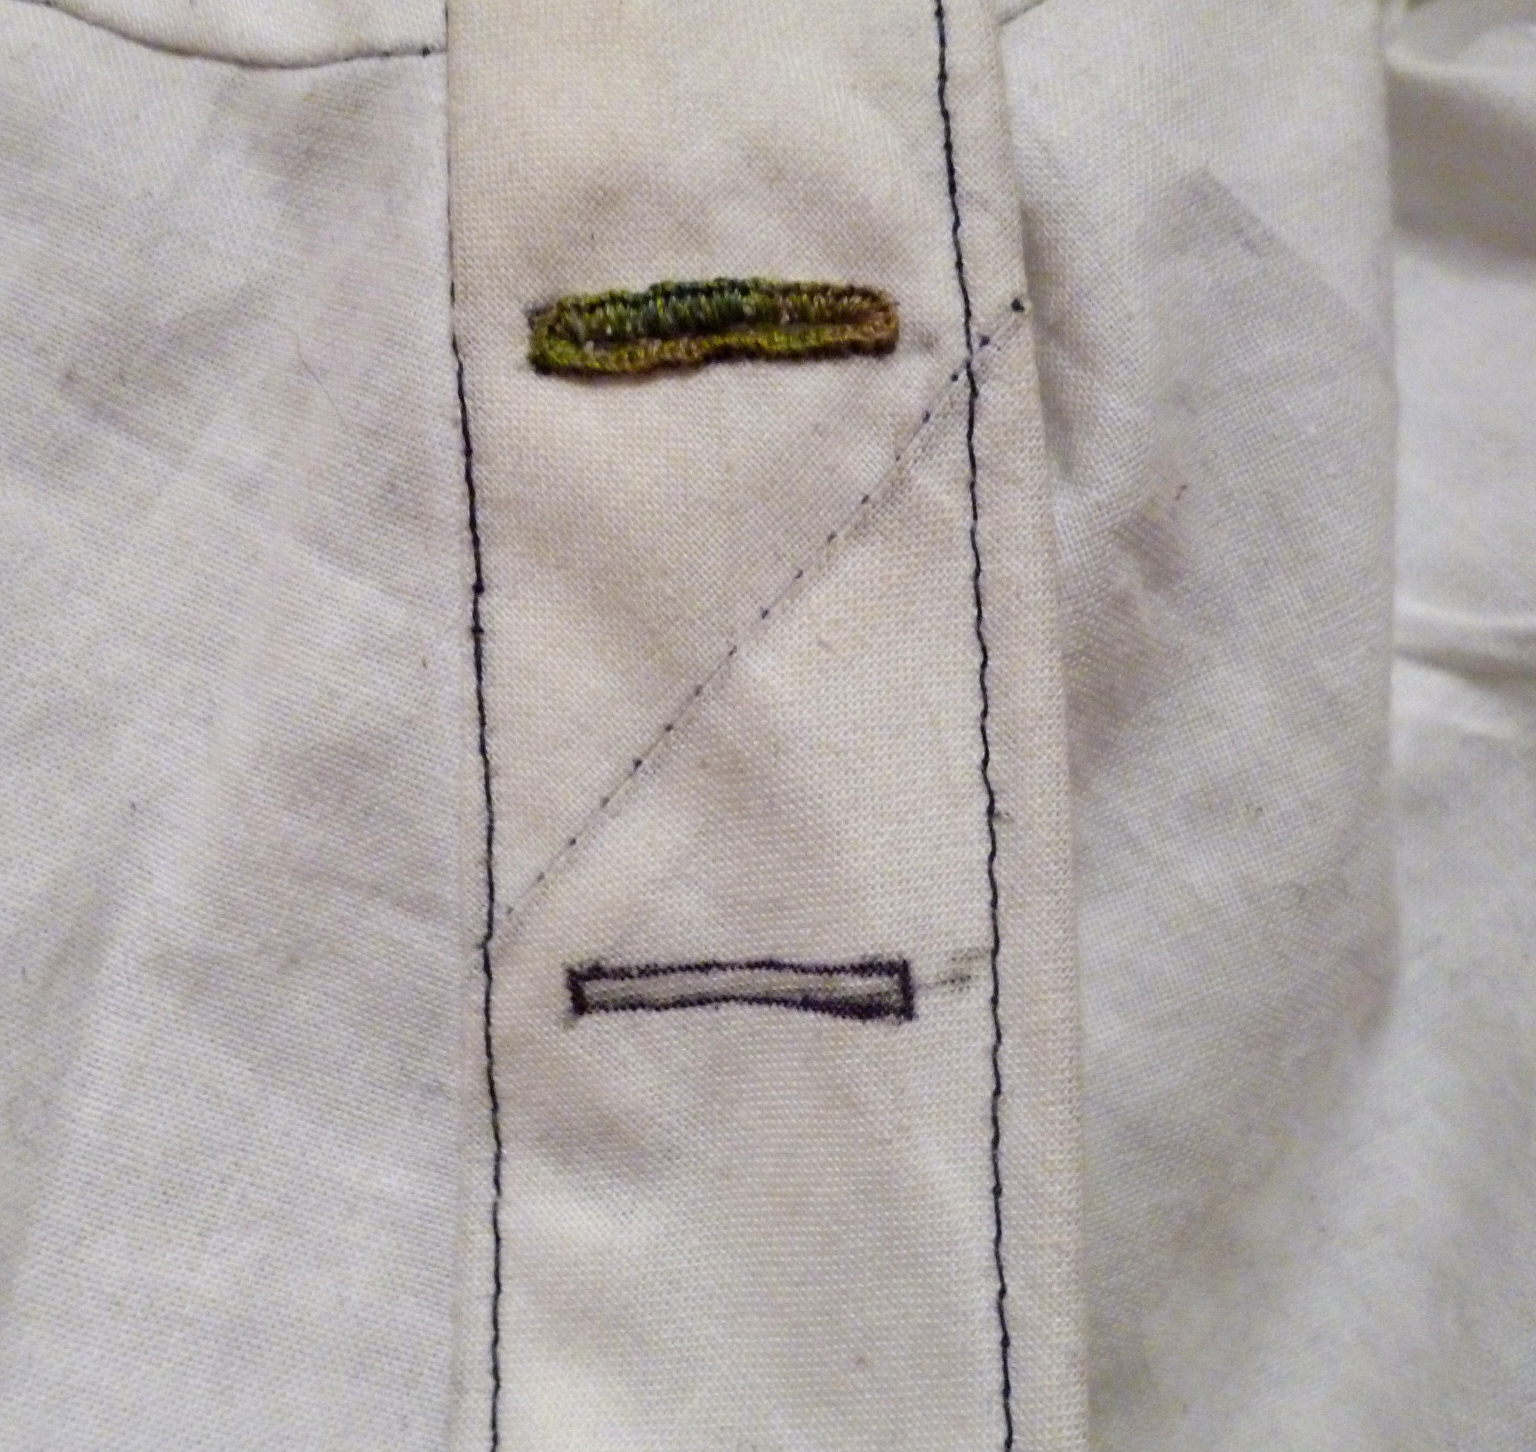
Next, using a simple backstitch, stitch along the outline of your marking.

Stitch two rows of backstitches. This will help secure the fabric once it has been cut and as you work the buttonhole stitch.

Next, carefully pierce the fabric through which the button will eventually pass. You can use an awl or simply a small, sharp pair of scissors. Pierce near the corner where you wish to start working the buttonhole stitch.

Enlarge the hole just slightly with a pair of scissors. I prefer to cut as I stitch as opposed to cutting the whole buttonhole all at once. I find this works better as it eliminates fraying and slipping of the backstitches. Bring needle and thread up through the fabric on the outside of the backstitches near a corner to begin buttonhole stitch.

Begin the buttonhole stitch by passing the needle and thread through the buttonhole opening. Do not pull taut. Instead, bring up the needle directly left of where the thread originally emerges. Take that thread and bring behind the needle, wrapping it around the front of the needle and hold taut as you pull the needle through.


Continue stitching around, carefully clipping the fabric as you go.

To finish off, bring needle and thread through the fabric to the back directly next to last stitch made. Run needle and thread through a series of stitches along the back and simple trim.

And now you’ve got a buttonhole!


White cotton voile, hand sewn handkerchief measuring 13″ by 13″.

Embroidered with DMC Coton a Broder #30 in white.

Not the neatest embroidery I’ve ever done, as I’d never worked with the fabric nor the thread before & I really just wanted to test out the process. The next will be much better, I’m sure.
I just finished embroidering my 18th century pocket and, since I’m waiting for the wool for my next project to arrive, I thought I’d be indulgent & embroider myself a nice handkerchief to use during our humid summers. I had ordered a couple of yards of white voile in December to use for chemises but there wasn’t enough length. After much debate, I decided it would be perfect and cut into it before I could change my mind.
This interim project presented me with a good opportunity to post another hand-stitching tutorial. Rolled hems are great for projects like handkerchiefs because they create a narrow hem with little bulk and a delicate appearance. They do feel a little tricky at first but as you work you’ll quickly get the hang of it, I promise.
To start, fold the edge of your fabric over desired amount (in my case, a little over a millimeter) and pinch between your fingers.

With your needle, pick up one to two strands of thread from the fabric right before the edge that’s been folded over.

Then insert the needle through two to three strands of thread from the fabric on the fold.

And just pull your needle and thread through and repeat!
I hope that makes sense. I’m crap at explaining instructions verbally since I’m a visual learner and so I tried to take photos that were fairly clear. Also, our gas company has been laying new pipe and jack-hammering three feet from my bedroom window for a week, so I’m running on pretty minimal sleep. If I’m not explaining this well, drop me a comment, I’ll take a nap & try to explain it better when cognition has returned.
 Bagels
- 240 ml water, room temperature
- 3 g dry active yeast
- .5 oz honey
- .5 oz caster sugar
- 1/2 tablespoon kosher salt
- 17 oz bread flour, 1.5 oz reserved
1) In a mixing bowl, dissolve yeast in water. Add honey, sugar & salt, mixing briefly. Add bread flour, reserving 1.5 oz, until thoroughly combined. Add remaining flour only if sticky.
2) Knead dough briefly to insure ingredients are combined, 1 to 2 minutes. This particular dough needs little, if any, kneading. Dough will be firm to the point of slightly “tough,” non-sticky but not smooth as with doughs that are kneaded.
3) Place dough in bowl (do not grease), cover with cling film and set in refrigerator to rise for 7 to 12 hours (overnight). Allowing the dough to rise very slowly in a cold environment makes for a “chewy” dough, perfect for bagels.
4) Remove dough from fridge and let come to room temperature. Punch down and let rise in a warm spot, until dough doubles in size, 1 to 1 1/2 hours.
5) Deflate dough and divide into six to eight pieces, depending on desired size. Between your palms, roll dough back and forth to form a rope. Length of rope is dependent on size of bagel you wish to achieve, though I usually roll mine out to five inches. If you have trouble rolling the dough out to achieve desired length, roll as much as possible and then let dough rest for ten minutes to let the gluten relax before trying again.
6) To form, overlap the ends of the ropes about 1/2 inch and rock the dough back and forth between your palms to seal. Try to achieve uniform thickness throughout your ring. The rings do not have to be perfect, just close to it, otherwise they won’t bake uniformly.
7) Set rings aside on floured surface to rise until slightly less than doubled in size.
Boiling Liquid- 1 to 1 1/2 gallon water
- 1 potato, peeled and cut into quarters
8) While dough rises for the last time, in a large pot on high heat, combine water and potato. Bring to a boil and allow to boil until potato becomes soft and water becomes slightly cloudy, 15 to 20 minutes. Strain, reserving water & discarding potato.
9) Preheat oven to 450°F.
9) When dough has sufficiently risen, bring potato water back to a boil. Once boiling, gently drop rings into water two to three at a time. Boiling is what creates the chewy, crisp crust on the bagel. The longer the dough is boiled, the chewier the crust. Boil one side of bagel for 1 to 1 1/2 minutes depending on desired crust. Carefully flip the bagel over in the water and boil other side.
10) With slotted spoon, carefully remove boiled dough and transfer to baking sheet (not greased). Dough will be puffed and slightly shiny.
11) Baked for 10 to 12 minutes, until dough begins to brown. Flip bagels over and bake for another 10 to 12 minutes, until bagels are a medium to dark brown and shiny. Carefully remove from oven and allow to cool on wire rack.
12) Enjoy!
Look what I got in the mail today! My cheapo modern machine just wasn’t cutting it in terms of sewing heavier fabrics and, so, Edgar bought me this 1922 Singer in exchange for a leather tool belt I’ve promised to make for him.

She’s a beauty, I think, even if she is a little rugged. All of her gears are as smooth as glass. I haven’t tried out the motor yet since I need to build a desk for her but I’ll mostly be using the hand-crank, either way. Motorized machines and I are not the best of friends so it’s nice to have a non-electrical option, especially if the zombies come a-knockin’.
Now, to just figure out a name . . .

